

Top 10 Sound Experiments: Fun & Easy
Sound, an intrinsic part of our lives, is more than just a medium for communication and entertainment. It is a fascinating scientific concept, offering insights into how energy travels and interacts with our environment.
This carefully curated selection is designed for learners of all ages, covering fascinating topics like vibration, sound waves, pitch, and resonance. These hands-on, educational experiments will not only amplify your understanding of the science of sound but also strike a chord with your innate curiosity.
We hope you enjoy this compilation of sound experiments and that it inspires you to continue exploring the wonders of science.
1. How to See Sound Experiment
The How to See Sound experiment is a fascinating way to explore the relationship between sound waves and visual patterns.
The How to See Sound experiment is a fun and insightful experience that is likely to pique your interest, whether you’re a scientific enthusiast, an artist, or just someone who enjoys discovering the wonders of the world around you.
2. Glass Bottle Xylophone
Seeking an innovative and entertaining technique to learn more about the science of sound? With the help of the Glass Bottle Xylophone experiment, students can build their own musical instrument and learn about the fundamentals of sound.
3. Singing Spoons
Do you want to learn more about the science of sound in a playful and imaginative way? Using just a few spoons, the Singing Spoons experiment is a fascinating and fun project that you should try.
4. Make a Straw Oboe
Make your own musical instrument by cutting a straw to a specific length and blowing across the top to create different notes. Experiment with different straw lengths to produce different pitches.
5. Create a Thunder Drum!
Creating a thunder drum is a unique and exciting way to explore the properties of sound and can help students understand these concepts in a more tangible way.
6. Musical Wine Glasses
The musical wine glass experiment is a fun and easy way to explore the science of sound and create your own musical instrument. By filling wine glasses with different amounts of water and tapping them with a spoon, you can produce a range of musical notes and create your own melodies.
7. Tuning Fork Resonance Experiment
The tuning fork experiment is an established representation of how resonance and frequency work in the study of sound.
Students can see and measure the effects of resonance and frequency in this experiment by experimenting with various objects and tuning forks of different frequencies.
A hands-on introduction to the fundamental concepts of sound and waves is provided by this simple yet interesting experiment.
8. The Doppler Effect with Sound
Through the use of sound waves generated by a moving sound source, students can investigate the Doppler effect in this experiment.
Students can learn about the Doppler effect and its use in disciplines like astronomy and radar technology through this exercise in an useful and fascinating way.
9. Soundproofing Experiment
Students can learn about the science of soundproofing and its importance in building pleasant and effective surroundings through this project, which is a practical and hands-on learning experience.
10. Standing Waves
With the help of this experiment, students can learn about the fundamentals of wave interference and resonance as well as how these ideas are used in real-world situations.
Similar Posts:
- 68 Best Chemistry Experiments: Learn About Chemical Reactions
- Top 100 Fine Motor Skills Activities for Toddlers and Preschoolers
- Top 58 Creative Art Activities for Kids and Preschoolers
Leave a Comment Cancel reply
Save my name and email in this browser for the next time I comment.

5 Sound Wave Experiments for Kids
This post may contain affiliate links.
Teaching little ones about the 5 senses can be so much fun! Today I want to show you some fun and easy sound wave experiments you can do with your kids!
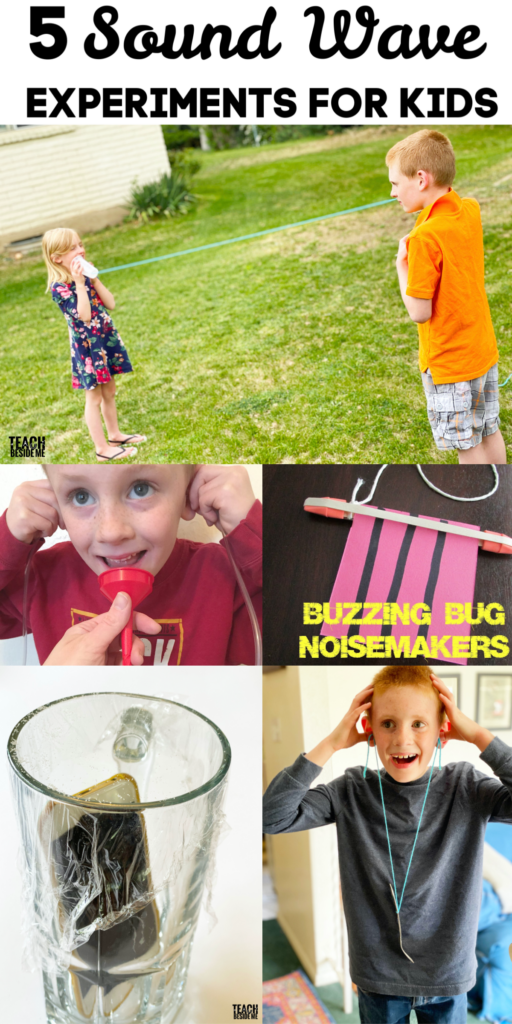
Sound Wave Experiments for Kids:
Following are five fun sound wave experiments you can make at home with just a few simple supplies. Your kids or students will love them. If you are teaching about the human body and how ears work, or maybe have a lesson on the five senses, I am sure you will find one of these that will work perfectly for you!
Experiment #1 The Magic Ear Trick
The first sound wave experiment is this magic ear trick. This sound trick makes you think the sound is coming from the opposite direction from where it really is coming from. It tricks your brain! We saw this at a science museum a few years back and my kids had so much fun with it that we wanted to try to recreate it at home.
To make it, you need small tubing (I got this fish tank tubing ), two small plastic funnels and a piece of PVC pipe or paper towel tube.
Attach a funnel to the end of each piece of tubing. We secured ours with duct tape .
Put the tubing through the pipe with each one going in the opposite direction.
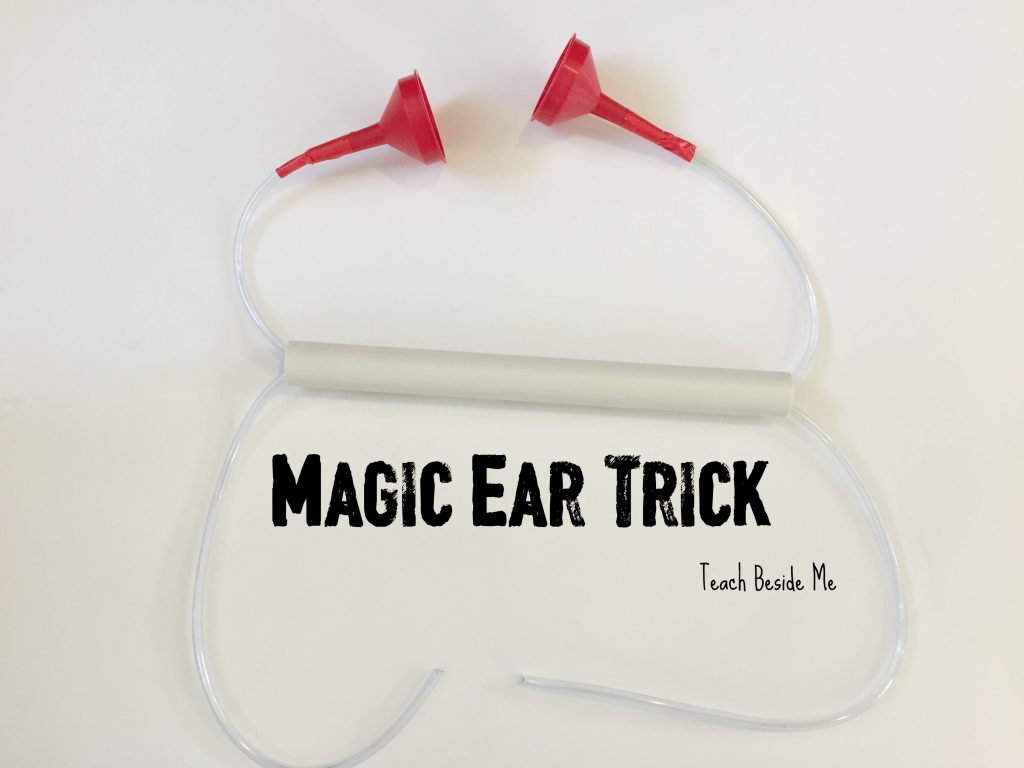
Place the end pieces in each ear.
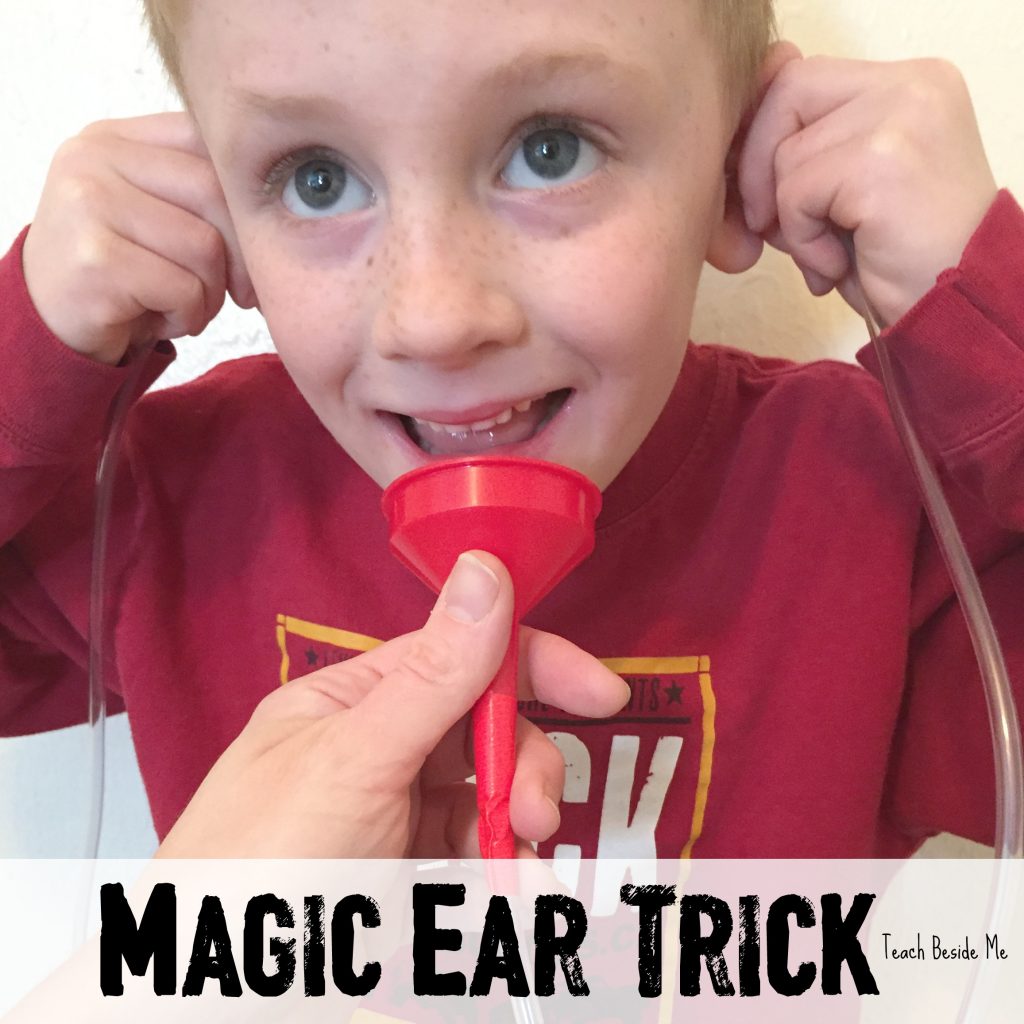
Have someone talk into the different funnels. You could move it up behind their head so they don’t know which one you are talking into. Then let them guess which side you are talking on. It will be the opposite ear from where you are making it like a magic trick!
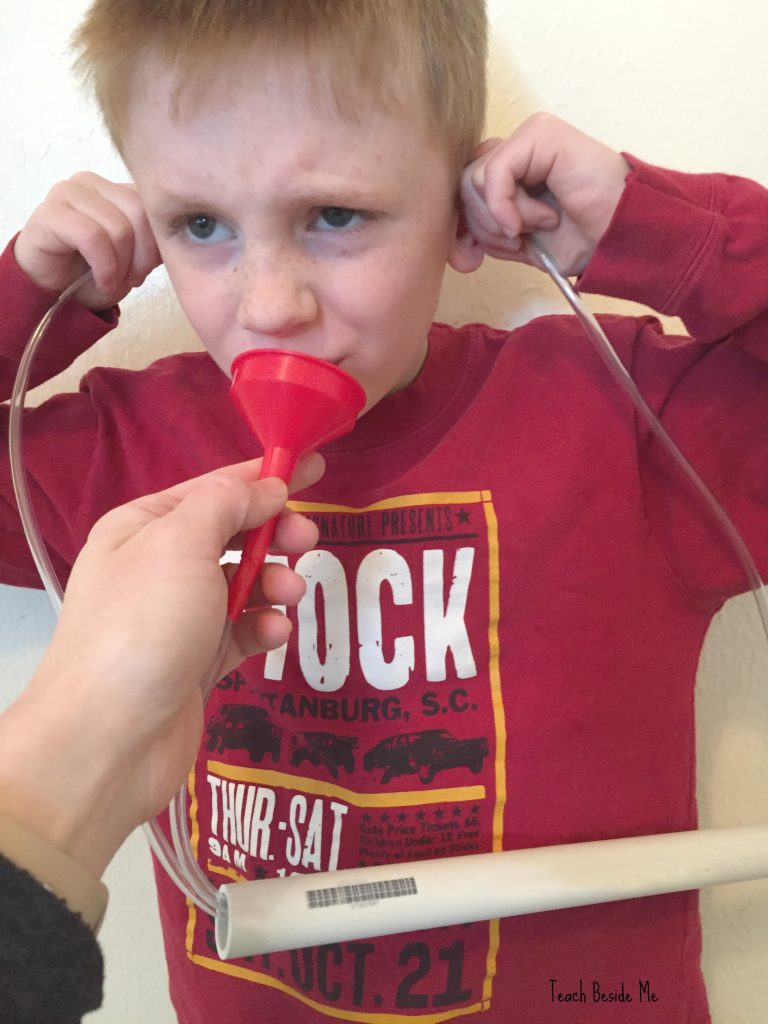
It’s really funny to watch kids faces when they hear it. I love his confused look in that picture above! It got my son laughing so hard that he could not tell where the noise was coming from!
What’s Happening?
The sound is traveling through the tubes, Your brain thinks the one on the right will be heard in the right ear, but it is the opposite! It tricks your mind and confuses you!
Sound Wave Experiment #2 The Ringing Fork on a String
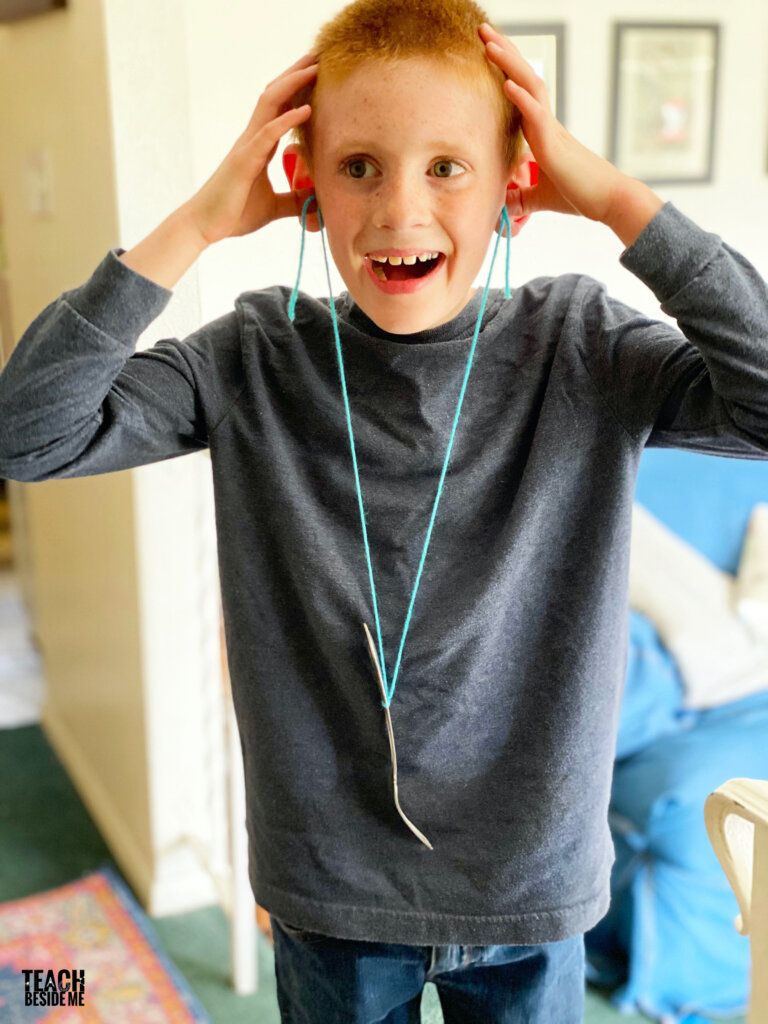
For this simple sound wave experiment you just need a fork or a spoon tied onto a piece of yarn. Make sure the yarn is long enough to hang down from your ears to around your chest or stomach. Tie the fork right in the center of the piece of yarn or string.
Now, tuck the ends of the yarn into your ears and tap the fork on an object. You will hear a large gonging sound or a ringing in your ears! The funny thing about this is that nobody else hears it like you do. And everyone is shocked at how loud the sound is!
The Science Behind It:
When the fork hits another surface it will vibrate. These vibrations make the air around it move, too. These are sound waves! The vibrations, or sound waves, move up the string and allow your ears to hear it. Sound travels best through a solid object, no the air.
Sound Wave Experiment #3 Make a Cup and String Phone
This is a great classic experiment that’s been around as long as I can remember. But it is still so much fun to do with young kids! You need two plastic or paper cups and a long piece of string or yarn.
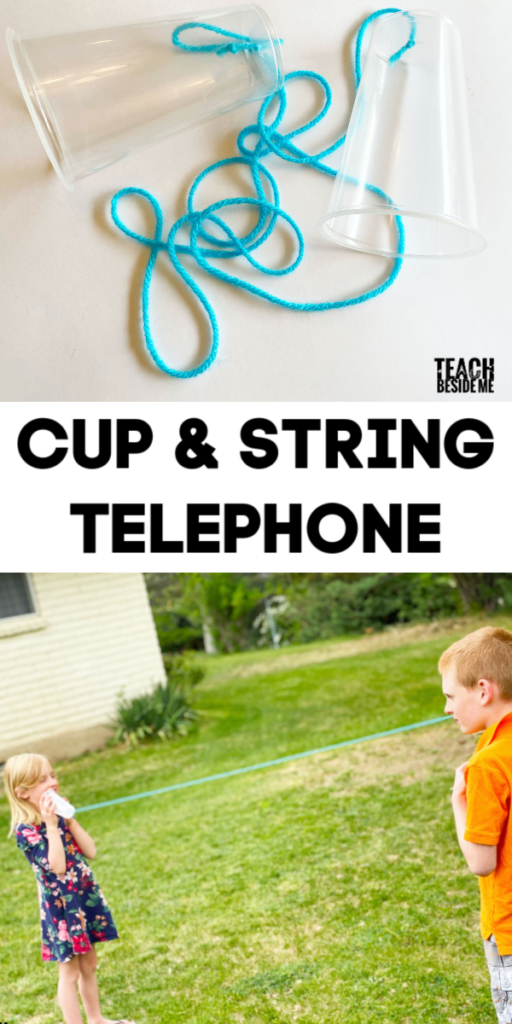
Poke a small hole in the bottom of each cup. Put the string through the holes and tie knots on the inside to keep the string in place. Do this with both cups.
Now pull the string tight- it needs to be tight for the phone to work and the sound waves to be able to travel through the string. On person puts the phone to his or her ear and the other to their mouth. Whisper or talk quietly into the cup and the other person will hear the sound of your voice in the cup!
My kids like to make two to use at once, then they can both talk and listen without switching the cups back and forth.
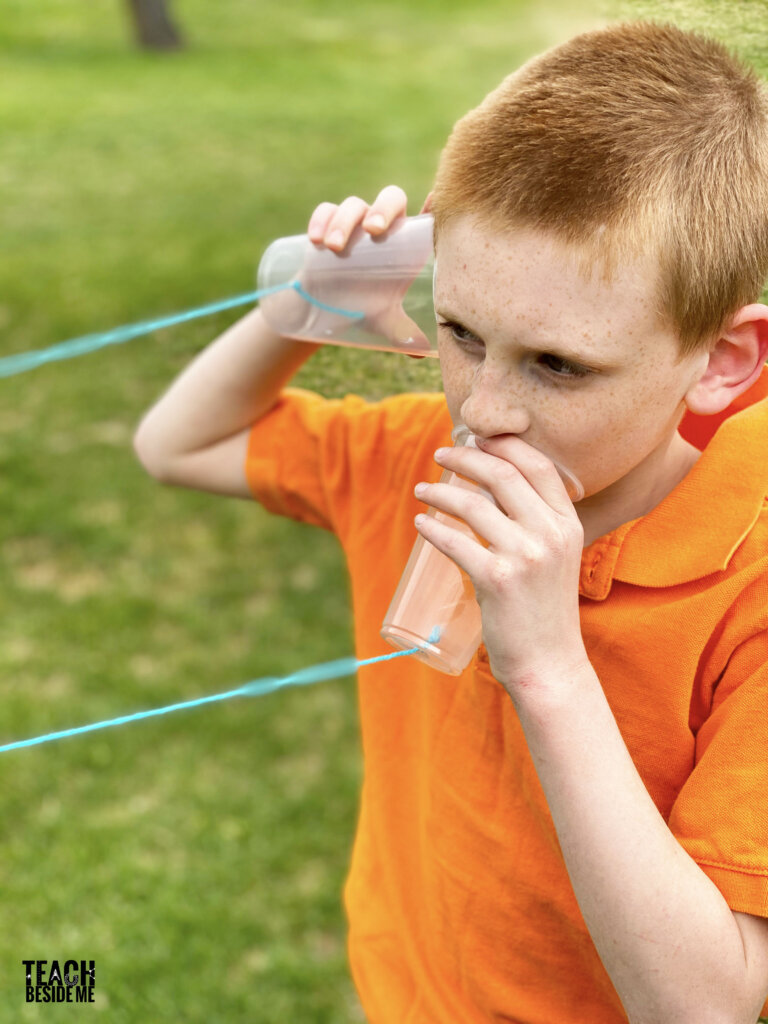
When we talk, our vocal cords vibrate beginning the motion of the sound waves. Our ears have tiny hairs inside that pick up those sound wave vibrations and send them to our brain to translate. When you talk through the phone, the string carries those waves from one cup to the other allowing us to hear each other!
Experiment #4 Make a Buzzing Bug Noisemaker
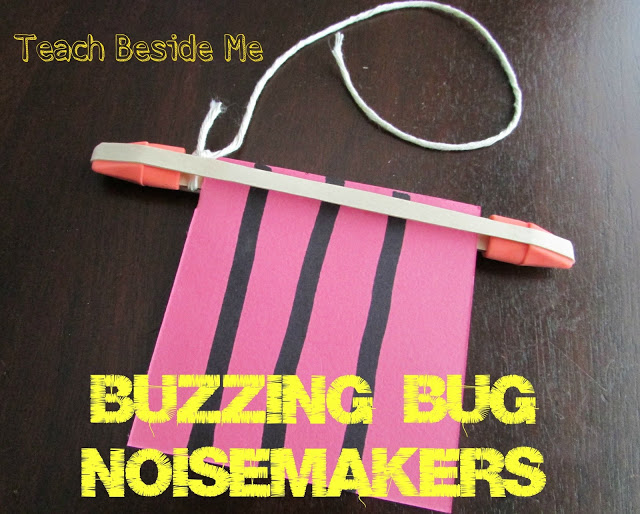
This is a fun experiment! You can find all of the instructions to make it here: Sound Experiment: Buzzing Bug Noisemaker Toy
This buzzing bug noisemaker simulates the sound of insect wings that bus when they fly. It’s simple to make and kids love playing with them! You just spin them around and listen to them buzz.
Sound Wave Experiment #5 Seeing Sound Waves~ Dancing Sugar
This is an easy experiment to put together and a great visual for seeing how sound waves work!
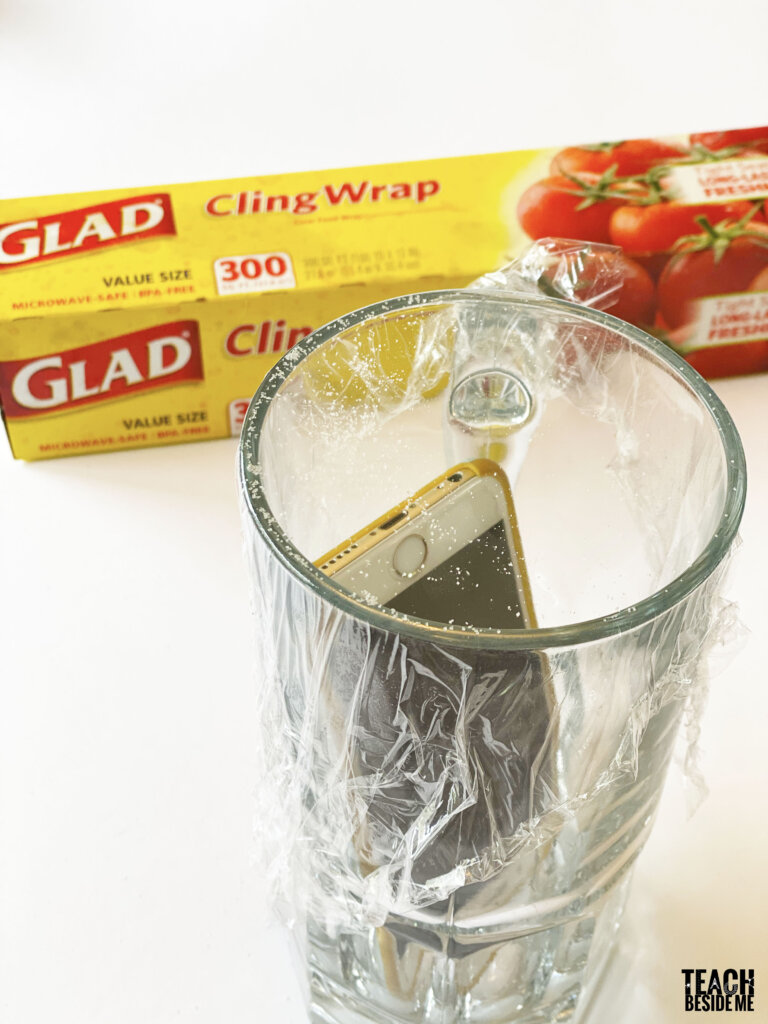
Put a phone in a glass. Turn on some loud music with a lot of great bass. Cover the glass with plastic wrap and sprinkle some grains of sugar on top of the plastic wrap. You will be able to see the sugar dance! It is really cool.
Now explain to the kids how this works! The vibrations from the sound waves are making the sugar move.
Expand this lesson on ears and sound by reading The Ear Book by Al Perkins with your kids. It’s such a fun one!
Want more sensory activities for the 5 senses? Check these ones out:
- Try this Guess the Spice Activity for the sense of smell.
- Try this Tapioca Pearl Sensory Play activity for the sense of touch.
- Try a Cake Chemistry Experiment for the sense of taste.
- Try Color Mixing with Light for the sense of sight.
- Five Senses Activities for Kids
Former school teacher turned homeschool mom of 4 kids. Loves creating awesome hands-on creative learning ideas to make learning engaging and memorable for all kids!
Similar Posts

Pretend Play: Anatomy Lab

The Seeds We Eat- Nature Science

Chemistry Experiments for Middle School or High School

Water Chemistry Experiment with at Home Water Testing

How to Build a Strong Catapult: STEM Learning Activity
Eric carle grouchy ladybug activity ~clock stories, leave a reply cancel reply.
You must be logged in to post a comment.
7 Cool Sound Science Experiments for Kids
Nov. 19, 2018
When it comes to science experiments, some of the most enjoyable involve the science of sound. If you’re looking to dazzle your little learner with exciting new experiments, look no further than simple sound science experiments that use everyday household items to bring sound to life. Let’s explore 7 riveting ideas to discover the science behind sound! Watch educational videos with scientific experiments and show them to your child.

The Classic Paper Cup and String Phone
A much-loved childhood project, the paper cup phone is much more than a fun and old-fashioned way for kids to communicate throughout the house. This elementary sound science project shows kids how sound waves can travel through a string and be converted back to audible sound at the opposite end.
Supplies Needed:
- 2 paper cups
- Long string, like fishing line, kite string
- A sharp pencil or needle to poke holes in the cups
What to Do:
1. Start by cutting a long piece of string of at least 50 feet.
2. Poke a small hole at the bottom of each cup.
3. Using each end of the string, thread it through the bottoms of the cups, tying a large knot so that the string does not fall out of the cup. If you make the holes too large, use a washer or paper clip to hold the string in place so that it does not pull out of the cup.
4. Move into position and encourage your child to move away from you so that the string is far enough to make it tight. Be sure that the string does not touch any other object and that it remains suspended in air as you complete the experiment.
5. Taking turns, talk into the cup, while the other person listens by putting the cup to their ear. Tell your child to repeat what he or she hears after you have spoken and do the same in return!
After the experiment, explain to your child what is happening: sound waves created by talking through the cup travel through the line to the other end, converting back to sound on the opposite side!
Make Music with a Straw Pan Flute
Perfect for younger children, the following sound waves experiment not only involves creating a fun musical instrument your child could play with, but teaches kids how length can affect the pitch of sound waves.
Supplies Needed:
- At least 9 or 10 straws, more if desired!
- Clear gift wrap tape
1. Take the straws and line them up side-by-side and cut them at an angle at the top.
2. Tape the straws together to make a pan flute.
3. Instruct your child to blow through the straws. Which straws make higher and lower pitches? Why?
Feel free to use more straws and experiment with different lengths to produce different pitches and sounds! Ask your child to explain what happens to the sound the shorter a straw is cut, and create double pan flutes to make harmonies to further explore how length alters the pitch.
Listen to Sounds Travel Underwater
Sound travels well through air, but it travels even better through water! This easy sound experiment for kids can be done in a jiffy out on the back porch.
- A bucket filled with water
- A large plastic water or soda bottle
- At least 2 kitchen knives
- Scissors or sharp knife to cut the bottle
1. After filling the bucket with water, take a sharp knife or kitchen shears and help your child cut off the bottom of the plastic water bottle. Be sure that the cap is taken off of the bottle.
2. Instruct your child to place the bottle in the water so that the cut bottom is in the water. Your child will then put his or her ear to the top of the bottle to listen.
3. Using the kitchen knives, clang them together to make a sound, but do this in the bucket as your child is listening. What does your child hear?
Your child has probably noted that the sound of the clanging is loud and clear. Water travels faster through water than in the air, and animals that live underwater are able to hear sound clearly. Discuss the results with your child, to teach him or her more about the conduction of sound waves through water.
See the Sound
Sound vibrations travel through air, water, and even solid objects, but it’s not possible to see the waves. What if we could see the waves in another way? This science of sound experiment makes sound more visible by forcing objects to react to the sound vibrations.
- Empty clear mixing bowl
- Plastic wrap
- Large rubber band
- Sugar crystals- Sugar in the Raw works great, or make sugar crystals in another science experiment!
1. Wrap a sheet of plastic wrap over the mixing bowl so that it’s taut, and secure with the large rubber band. Be sure that the plastic wrap is tight and does not sag.
2. Place a few of the sugar crystals on the top of the plastic wrap, placing them in the middle of the wrap.
3. Instruct your child to get close to the sugar crystal and say something loudly! What happens to the crystals? Do they move?
4. Experiment with louder and softer words or sentences to watch the sugar crystals react to the sound vibrations!
While your child might think it’s his or her breath making the crystals jump and move, but it’s actually the sound vibrations. Try different sounds besides ordinary speech and see how the crystals come to life!
Make a Stick Harmonica
Making musical instruments are easy and fun, and they teach kids about sound waves and pitch. This experiment is much like the pan flute above, but kids can alter the pitch by sliding the straws without reassembling the harmonica.
- 2 large craft sticks
- 1 wide rubber band
- 2 smaller rubber bands
- 1 plastic drinking straw
1. Using the scissors, cut the straw into 2 one-inch pieces and set aside.
2. Take the wide rubber band and stretch it length-wise around one of the jumbo craft sticks and place one of the straw pieces under the rubber band, close to the edge on one end.
3. Take the other craft stick and place it directly on top of the craft stick with the rubber band. Secure them together at the ends using the small rubber bands.
4. Finally, take the last piece of straw and place it in the harmonica between the sticks on the opposite end from the other, but this piece should be fit above the wide rubber band instead of below it.
5. Encourage your child to play the harmonica by blowing in the center of the harmonica! Explore different pitches by moving the straw pieces!
After playing the harmonica, don’t forget to complete the sound experiment by talking about the mechanics of the harmonica. The vibrating rubber band makes all the noise, and the closer the straw pieces are to the center of the harmonica, the higher the pitch will be due to the shortened length of the band!
Experimenting with Sound Waves
It might be hard to imagine that sound waves can travel through solid objects as well as through the air. This simple but exciting sound waves science activity will demonstrate for your child how sound can and does indeed travel through solid objects!
- Metal kitchen spoon- a large metal measuring spoon works great!
- At least 30 inches of kite string
1. Stretch out the string and tie the handle of the spoon in the middle of the string.
2. Take one end of the string and tie around your child’s pointer finger. Do the same using the other end, but tie this string around the pointer finger of your child’s opposite hand.
3. Instruct your child to put his or her fingers, with the string wrapped around each, into their ears.
4. Help your child lean over so the spoon dangles and help him or her swing the spoon so it hits a nearby door or wall.
5. Hit the door or wall again, but this time with more force. What does your child hear?
Your child should hear a bell-like sound travel up the string from the spoon and into their ears. Discuss with your child how the sound waves created from the spoon hitting the door moves through the string until he or she is able to hear it!
Xylophone Water Jars
Musical instruments are so much fun to make! This sound activity teaches children how varying levels of water in containers change the pitch of the sound created.
- 4 empty and clean baby food jars
- 4 different colors of food coloring
1. Help your child fill each jar with varying amounts of water.
2. Add a few drops of food coloring to each jar.
3. Using the mallet, instruct your child to firmly tap the outside of each jar. What sounds are being made? Which jars have the highest or lowest pitch?
Encourage your child to hypothesize why some jars emit a lower sound, while others are higher. Play around with the water levels in each jar and experiment with pitch!

Learn Science with Kids Academy Classroom!
Use this interactive Classroom by Kids Academy called Sound is All Around Us to teach first graders the basics of sound science. OPEN THE CLASSROOM .

After clicking "Next", you'll find a set-up lesson with an educational video, accompanied by practice worksheets and summary quiz to help kids better understand and remember the learned material.
Equipped with our extensive learning resource library, Kids Academy Classroom allows teachers and parents to create lessons and share them with the young smarties in a couple of clicks.
Go directly to the Classroom page and create a quick classroom on any topic you want! After students complete the lesson, you'll get access to a report about their performance. Check out our Classroom Guide article for more information!
Now that you have 7 cool ideas for exciting sound science experiments, it’s time to get started! Your child will love learning all about the science of sound and the endlessly fascinating ways sound waves can travel through air, water, and objects. Don’t forget to check out our science worksheets and activities to supplement your child’s learning in between all your child’s experiments!
Related Articles
Cancel anytime
You'll be able to manage the favorite spreadsheets list.
You’ll be able to hide/mark the accomplished tasks.
- School / District Account
- Family Account
- 2 PDF worksheets per day
- Interactive worksheets
- Targeted ads
- KidsAcademy ads
$ 1.99 / month
- Printable and interactive worksheets
- Learning videos
- Ad-free browsing

- Engage students and save time with ready-to-use premium educational activities.
- Unlimited Learning Library access
$9.99 / month

Cool Science Experiments Headquarters
Making Science Fun, Easy to Teach and Exciting to Learn!
Science Experiments
How to See Sound Science Experiment
What does sound look like? This fun 5-item science experiment helps kids “see” sound waves and have fun while doing it.
In this article, we include a demonstration video, a supplies list, detailed printable instructions, experiment variations, and an easy to understand scientific explanation of how it works.
Bonus: Kids love this experiment because not only are they allowed to make loud drumming noises, it’s required!
JUMP TO SECTION: Instructions | Video Tutorial | How it Works
Supplies Needed
- Plastic Wrap
- 1 teaspoon Uncooked Rice
- Metal Pan (Cookie Sheets or Pans are good options, but they must be metal)
- Metal Spoon
How to See Sound Lab Kit – Only $5

Use our easy How to See Sound Science Lab Kit to grab your students’ attention without the stress of planning!
It’s everything you need to make science easy for teachers and fun for students — using inexpensive materials you probably already have in your storage closet!
How to See Sound Science Experiment Instructions

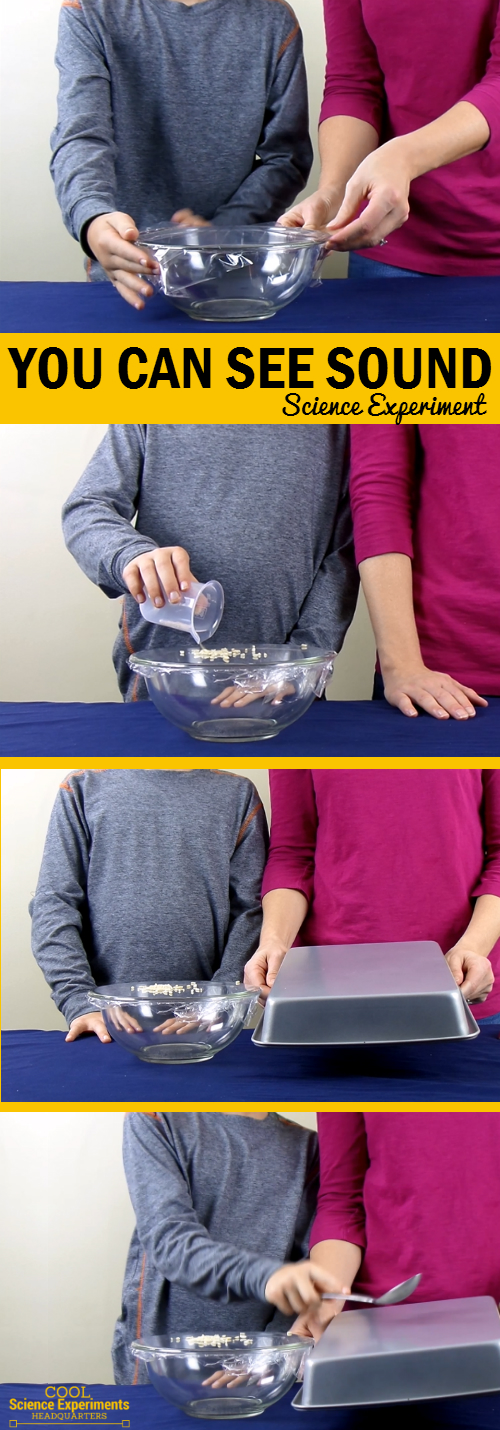
Step 1 – Tear off a piece of plastic wrap big enough to cover the top of the bowl.
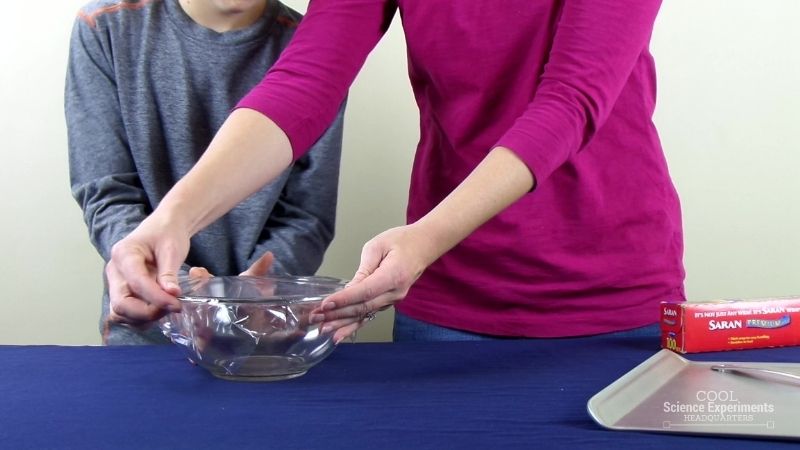
Step 2 – Secure the plastic wrap over the bowl. Make sure that the plastic wrap is very tight.

Step 3 – Pour 1 teaspoon of uncooked rice on the top of the plastic wrap.
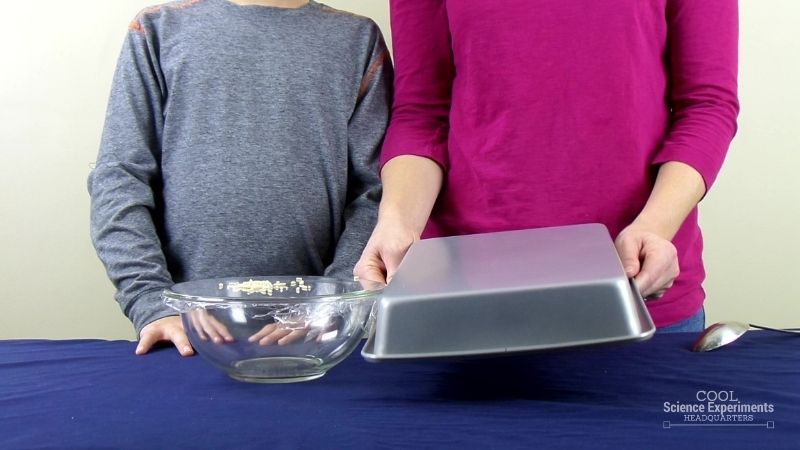
Step 4 – Hold the metal pan in the air and position it next to the bowl. What do you think will happen if you hit the pan with the spoon?
Helpful Tip: Remember, the pan must be metal or the experiment won’t work.
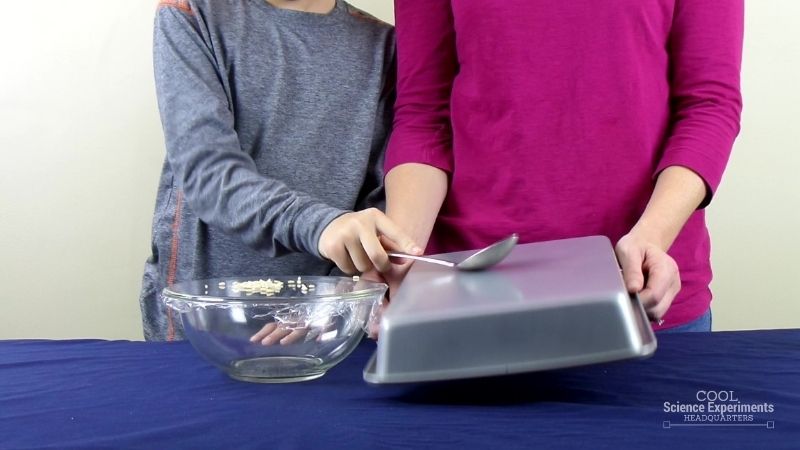
Step 5 – Take the metal spoon and bang on the metal pan like a drum and watch what happens to the rice. Write down your observations. Do you know the why the rice moved? Find out the answer in the how does this experiment work section below.
Video Tutorial
How to See Sound Science Experiment Step by Step Instructional Video
How Does the Experiment Work?
Sound is a disturbance that travels through a medium as a wave. In this experiment, when you hit the metal pan with the spoon, you disturb the particles of the pan causing them to vibrate. The vibrations in the pan are transferred to the air surrounding the pan, creating a sound wave.
When these sound waves reach the plastic wrap it disturbs the particles of the plastic wrap causing them to vibrate. These vibrations in the plastic wrap cause the rice to move. Sound waves traveling through the air are also what allow us to hear the noise of the spoon hitting the pan.
Other Ideas to Try
Try this experiment again, but change the distance of the pan from the bowl. As you move the pan farther away from the bowl, do the sound waves have the same effect on the rice grains?
I hope you enjoyed the experiment. Here are some printable instructions:
Instructions
- Tear off a piece of plastic wrap big enough to cover the top of the bowl.
- Secure the plastic wrap over the bowl. Make sure that the plastic wrap is very tight.
- Pour 1 teaspoon of uncooked rice on the top of the plastic wrap.
- Hold the metal pan in the air and position it next to the bowl
- Take the metal spoon and bang on the metal pan like a drum and watch what happens to the rice.
Reader Interactions
September 27, 2016 at 2:29 pm
I am trying to see the answer for the “Why can’t we see sound?” but I xan’t find it here. Can you help me, please?
February 2, 2017 at 11:37 pm
Invisible sound waves
May 21, 2019 at 9:57 pm
Sound is a vibration
March 12, 2017 at 10:15 pm
Because when you hit the tin it makes a hard and loud noise.
December 7, 2017 at 2:44 pm
This was an amazing experiment ever
January 31, 2018 at 5:08 pm
It is because the rice is having potential energy while it is on the wrap. Than and only then when you hit the pan is when it turns to kinetic energy.
October 31, 2018 at 8:56 pm
The sound waves bounce off the pan and travel to the drum. The drum vibrates and the rice jumps.
January 26, 2019 at 5:32 pm
Why can’t I get this to work
does the type of plastic wrap matter?
March 9, 2020 at 8:21 pm
it doesn’t work for me too 🙁
Leave a Reply Cancel reply
Your email address will not be published. Required fields are marked *
Save my name, email, and website in this browser for the next time I comment.

- Privacy Policy
- Disclosure Policy
Copyright © 2024 · Cool Science Experiments HQ
Educational Activities, Toys, and all things STEM
Science Experiments with Sound: 8 Fun Activities for Kids
*We’re an affiliate – we may earn a commission through qualifying purchases from the links on this page. As always, thanks!*
Sound is all around us, traveling in invisible waves. Since we can’t see it, we often take sound for granted. Today we’re doing some science experiments with sound. We’ll have some fun learning how sounds waves vibrate, how we can affect the vibrations, and how this affects what we hear. Listen up & let’s explore!
Jump to your favorite science experiment with sound: Sound Vibrations on a Flat Surface Drinking Glass Bells Cup and String Phone Big Box Bass Sound Tubes Stretched Strings Pipe Organ with Cardboard Tubes Soundproofing
Sound Vibrations on a Flat Surface
Here’s an easy science activity with sound we can do using items you most likely have in your kitchen. We’re going to see how sound waves cause vibrations and the affect this has on objects. You’ll need a few household items:
- Plastic wrap
- A rubber band
- Salt, Sugar, or dry rice
- Stretch some plastic wrap over a bowl. Pull it tight.
- Secure the plastic with rubber bands
- Sprinkle some salt on the plastic (or sugar or rice)
- Make some noise!
What’s Happening?
Even though you cannot see the sound waves, you can see their effect. The salt should bounce along the top of the plastic in response to sound. The louder the sound, the bigger the bounce.
The plastic acts in much the same way as your eardrum. When sound waves hit your eardrum, they cause it to vibrate. In the case of your eardrum, it’s sending those vibrational signals to your brain instead of bouncing grains of salt like we have on our plastic. We found watching the rice move easier than the salt or sugar.
Experiment with different sounds and volumes and note how the salt moves in relation to the sound. We found putting a bluetooth speaker inside the bowl before covering the top with plastic wrap helped a bit. Play something with a thumpy bass line and watch you grains dance across the plastic.
Drinking Glass Bells
- Drinking Glasses.
- A spoon (or chop sticks)
- Food Coloring (optional)
We can use drinking glasses to make a scale and play music (or just make some noise!) There are 8 tones in a major (or minor) scale, so we can shoot for 8 glasses.
Depending on the size of your glasses, we may need to mix and match different size glasses to find the range of a whole octave. There are a number of factors that affect the tone and pitch, like the size and thickness of the glass. If you don’t have enough glasses on hand, that’s fine; don’t let that stop you. Musicians have written songs and made entire careers of just a few notes! use what you have and make some music.
- Line the glasses up in a row.
- The one on the far right mostly full with water.
- Moving to the left, fill the remaining glasses with decreasing amounts of water.
- Tap each glass lightly with a spoon and listen to the tones.
- By adding water or dumping some out of each glass, you can “tune” your glasses. You can use a free app (like Pitchlab on Android or IOS) to help you find the notes and tune.
- For more fun, add a few drops of different food coloring for a rainbow water xylophone.
Notice how the amount of water in each glass affects the pitch. Less water makes a lower pitch, while more water creates a higher pitch. Why do you think that is?
If you have chopsticks, you can try using them like drumsticks to play your glasses.
Try wetting your finger and gently circling it around the rim of a glass. This works best with thinner glassware like wine glasses.
You can do a similar experiment with bottles filled with different amounts of water. If you blow across the top of the bottle, it will produce different pitched noted depending on how much water is in each bottle.
Cup and String Phone
This is a classic, and can be done with plastic cups or tin cans. It’s a great way to experiment with how sound vibrations can travel. We had some plastic cups, which are easier to punch holes in, so this is what we used. Here’s what you’ll need:
- 2 plastic cups
- A piece of string
- A pencil or scissors
- Use the pencil or scissors to poke a small hole in the bottom of both cups, just enough to fit the string through
- Thread the string through the holes
- Tie knots in the ends of the string so that it does not fall back through the holes
- Give one cup to your friend and hold the other. Pull the cups so the string is tight.
- Have your friend put their cup to their ear and talk into your cup. Now listen as your friend talks back
Your voice, like any sound, travels through the air in waves. When you talk into the cup, the sound waves from your voice cause the cup to vibrate. These vibrations are carried along the tight string and into the other cup.
What happens if the string isn’t tight? The sound doesn’t travel nearly as well. Why do you suppose this is?
Related Posts: Check out our full posts on plastic cup projects and activities with household objects for some fun things to do with items you probably already have around the house. Great no-prep ideas for you and your child!
Big Box Bass
The washtub bass conjures images of old timey jug bands, with DIY home made instruments. Instead of putting a hole in a washtub, we’ll use a large box. The principles at work are the same as our other vibrating string experiments. To make your own Big Box Bass, you’ll need:
- Large cardboard box
- Scissors or utility knife
- Popsicle or craft stick
- Paints or markers (optional for decorating your bass)
- Cut a hole on the top of the box, about 8-10 inches in diameter. This is the sound hole for our instrument.
- On the top of the box, poke a smaller hole or cut an “x” just large enough to fit the broomstick through
- Slide the broomstick through the hole and let it rest on the bottom of the box
- Attach one end of the string on the top of the broomstick, securing it in place with the thumbtack. Our broomstick had a convenient hole in it so we could just thread the string through and tie it.
- On the top of the box opposite of the broomstick, poke a small hole just big enough to fit the string through.
- Thread the sting through the hole and tie it around the popsicle stick, so that the stick prevents the string from going back through the top of the box
- Use the tape to seal the box.
- Pluck the string, and try moving the broomstick to adjust the tension on the string.
- Decorate or paint your box.
- Get Ready to Jam!
Plucking the string causes it to vibrate. The inside of the box is a resonating chamber, and the hold you cut in the top is a sound hole; much like an acoustic guitar. The tighter the string, the higher the pitch that will be produced. The more slack, the lower the pitch.
We found the box needed some weight inside the box to hold it down while playing it. Free weights, a few bricks, or whatever you can fit inside the sound hole should do the trick. Push down a bit on the broomstick as you play so it is secure on the bottom. Make sure there is tension on the string as you pluck it. Try plucking it and shifting the broomstick so it’s looser or tighter to get some good twangs out of the string.
Practice your music skills and see if you can play a familiar tune.
Sound Tubes
We got some of these “Pull and Pop” tubes for the kids to play with. They’re fun on their own, but we discovered a cool sound experiment playing with them. If you expand a tube all the way and swing it around in a circle, it makes a cool sound. The corrugated shape lends itself well to sound. These kids toys are also known as a whirly tube, corrugaphone, or bloogle resonator.
Our kids thought this was a fun activity, and science demonstrations don’t get much easier: Swing it slowly, and it makes a low pitch. Swing it faster and the pitch gets higher.
We’re hearing the difference in air pressure when swinging the tube. The end of the tube is swinging faster than the end being held, creating a relative increase in air pressure as the tube spins. This effect is known as Bernoulli’s principle. Bernoulli’s Principle tells us as the speed of air increases, the pressure decreases.
As the tube spins, the pressure lowers in the swinging end. The difference in pressure between the two ends of the tube causes air to travel through the tube from the end being held to the end that is swinging. The high pressure air in the fixed end travels through the tube to the low pressure area. The faster the tube spins, the greater the pressure. The air moves faster and increases the pitch.
Pro Tip: If you’re interested in these, get a larger pack . Our kids loved these so much they crinkled them to death, to the point where we couldn’t collapse some of them anymore. They’re great to play with, but will only survive so long.
Stretched Strings
Stringed instruments are capable of producing a wide range of pitches. We’re going to create a simple exercise with one string to experiment with how this concept works.
- A wooden board
- A small bucket or container
- Rocks, stones or weights
- Nylon fishing line
- A popsicle stick or craft stick
- Using the hammer, drive the nail into the top of the board near one end
- Tie one end of the fishing line to the nail
- Cut the fishing line to approximately twice then length of your board
- Tie the other end of the fishing line around the handle of the bucket. With the board resting on a table, arrange it so the bucket hangs over the edge but does not touch the floor
- Place the popsicle stick on its edge on the side of the board opposite the nail, and position the string over it. The string should push down on the stick with the weight of the bucket holding it in place
- Pluck the string and note the pitch of the string
- Add some weight to the bucket, and pluck the string again
- Experiment with different weights
- Now experiment moving the popsicle stick and pluck the string
Adding weight to the bucket increases tension on the string. This makes the pitch higher, like tuning the string on a guitar, ukulele, violin, etc..
Moving the popsicle stick changes the length of the string that is vibrating. Notice how this affects the sound. Think about how this relates to our water glasses in the experiment above, where the amount of water in the glass changed the pitch.
The popsicle stick in this case is like the bridge on a guitar or violin. Adding or removing weight from the bucket is similar to adjusting the tuners. It changes the tension on the string which results in a change in pitch. More tension makes the pitch higher, and less tension gives a lower pitch. This simple principle is what makes stringed instruments work.
What do you think would happen if you tried a thicker fishing line or different string? How would it affect the sound?
Pipe Organ with Cardboard Tubes
We’ll be using a number of cardboard tubes to make a pipe organ. This is similar to an instrument used by Blue Man Group, which you can check out in this video:
Mailing tubes, or tubes from rolls of gift wrap work great. You can also use regular paper towel or toilet paper tubes.
- Cardboard Tubes/Paper Towel Tube
- A flip flop
- Rubber bands or tape
- Cut the tubes into various lengths, roughly 1 inch difference between the tubes
- Arrange the tube longest to shortest from left to right
- Make sure the tops of the tubes are level
- Use the flip flop to strike the top of each tube
If you want to get kick this sound activity up a notch, you can use PVC pipes cut to length instead of cardboard tubes.
DIY Soundproofing
Now that we’ve looked at how sound travels in waves and made a bunch of noise, what about soundproofing? How can we dampen or quiet the sound? We’re going to experiment with some techniques that help diffuse the sound.
We’re going to look at two major factors: Materials and Shape. Have you ever noticed how some rooms or spaces echo sound and some do not? The surface materials have much to do with how sound waves travel within that space. Materials like tile or concrete reflect the sound, while softer materials like carpeting or foam absorb the sound.
Shape works similarly. Flat surfaces bounce the sound waves directly back, while irregular surfaces diffuse the sound by bouncing it back at different angles.
This is why bathrooms or stairwells seem to have echos, while recording studios tend to use foam tiles that look like egg crates. We’re going to use these principles to build a sound proof box, similar in theory to this:
To DIY something similar, you will need:
- Cardboard box
- Several Egg Cartons
- Towels or rags
- Tape or hot glue gun
- A radio, bluetooth speaker, or phone to make noise
- Cut the egg cartons so you have the parts that the eggs rest in. You’ll need enough to line the entire inside of the box
- Use the tape or a hot glue gun to secure the cartons to the sides of the box, as well as the underside of the lid.
- You can fill in any gaps with the towels or rags.
- Place the radio or speaker inside of the box and turn it on so you can hear the noise
- Close the lid of the box
How loud is the noise? Can you hear it clearly, or is it muffled? What’s Happening?
The sound is dampened by the egg carton and towels. The materials are soft, and absorb the sound instead of reflecting it. The surface of the egg carton is uneven and reflects the sound at a number of angles, weakening it.
Science Experiments with Sound – Wrap Up
We hope you enjoyed the science experiments with sound as much as we did. Sound surrounds us and moves through us. It’s not exactly “the Force” that binds the galaxy together, though we often take the effect sound has on us day to day for granted.
With some simple experiments for kids, we learned some of the principles that go into designing many musical instruments and had some fun playing (and making noise.) The kids liked how changing the length of a string or swinging a sound tube faster changed the sound. They also loved to learn that they were in control of it. The idea that their actions change what they hear is powerful. I was surprised how big of a hit the Big Box Bass was, and how that lead to questions about my bass guitar. Once we did the Drinking Glass Bells every dinnertime has had a special performance. Which sound experiment or activity was your favorite?
More Fun Activities
Looking for more fun activities? Sign up for access to our free printable library for some awesome activities for home, home school, or classroom:
Looking for more STEM Projects and Activities? Check out our other STEM Challenges .
About the author
hevanmiller
Latest Posts
3d printing christmas ideas.
Spread the loveThe holiday season is all about making memories, though sometimes it can be tough to find that perfect festive touch. 3D printing can be a game-changer that can help you whip up unique gifts and decorations in no time. Whether you’re a seasoned maker or just curious about this techy hobby, 3D prints…
DIY 3D Printed Christmas Ornaments: Fun Designs to Make This Season
Spread the love3D-printed ornaments provide a creative and unique way to add a personal touch to holiday decorations. These designs range from classic shapes to intricate themes, making them versatile for different tastes and styles. 3D prints are easy to customize; you can experiment with various colors, sizes, and finishes to create elegant holiday decorations…
Christmas Science Experiments for Kids
Spread the loveRing in the holiday season with some festive Christmas science experiments. These hands-on activities combine holiday cheer with educational fun. Each project offers a simple way to make learning exciting during the holiday season. The kids have time off and need some things to do. Try these seasonal STEM activities to keep them…
Advertisement
Science Projects for Kids: Producing Sounds
- Share Content on Facebook
- Share Content on LinkedIn
- Share Content on Flipboard
- Share Content on Reddit
- Share Content via Email

Science Projects for Kids: Producing Sounds introduces kids to the science of noise. We all take sound for granted and few of us ever stop to wonder how sound really works. These simple and fun science projects for kids will help kids -- and parents -- start to understand the fascinating process behind sound.
Start learning about the science of sound with these fun and easy projects:
Sound Wave Model
Find out how sound travels from molecule to molecule.
A Simple Telephone
With some string and a couple of plastic containers, discover how sound travels to a telephone.
Bottle Music
Learn how the volume of water and air in a bottle produces various sounds.
Sound Barriers
Stop sound waves in their tracks with these simple science project.
Go to the next page to start experimenting with sound waves.
For more science projects for kids, check out:
- Science Projects for Kids: Soil Experiments
- Science Projects for Kids: Light and Heat
- Science Projects for Kids: Reflection and Refraction
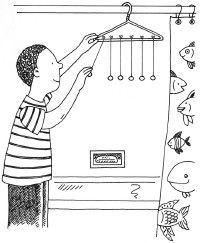
Ever wonder how your voice carries across a room? Make a sound wave model to mimic the movement of air molecules when carrying sound. You may be surprised to find that it takes a lot more than just a strong set of lungs to be heard.
What You'll Need:
- Six metal ball bearings
- Clothes hanger
Step 1: Cut six pieces of thread, each 10 inches long, and attach an end of each thread to a ball bearing using tape.
Step 2: Tie the other end of each thread to the horizontal piece of a clothes hanger, leaving about one inch between each thread that you tie. Hang the hook of the clothes hanger from a shower-curtain rod.
Step 3: Pull back one of the end bearings. Let the bearing go so that it strikes the next one. Watch what happens. It hits the second, which swings and hits the third, and so on.
Sound travels through the air in the same way. A vibration causes one molecule of air to move and bump into another molecule, which then moves at the same rate and bumps into a third molecule, and so on.
Go to the next page to learn how sound travels through a simple telephone.

In the past, when kids wanted to share a secret or play communication games, they'd use a simple telephone. It may not have been as cool as a cellphone or a walkie-talkie, but it was effective. Try this science project on producing sound to learn how a simple telephone works.
- Nail or other pointed object
- Two hard-plastic containers (such as cottage cheese containers)
Step 1: Use a pen to punch a small hole in the middle of the bottom of each of two hard-plastic containers, such as cottage cheese containers. Thread one end of a 12-foot piece of string through the hole in each container so that the end is inside the container. Tie knots in each end so the string will not pull out through the hole.
Step 2: Hold one cup, and give the other to a friend. Walk far enough apart so the string between the cups is pulled tight. The string should not be touching anything except the plastic containers.
Step 3: Ask your friend to hold the cup over one ear while you whisper into the other cup.
Your voice will make the string vibrate. The vibration will travel along the string to the other cup, and your friend will clearly hear what you whispered. Now listen while your friend whispers.
Build other phones that use different lengths of string and different kinds of containers, and compare how well they work.
Continue on to the next page to learn how volume and mass can produce bottle music.
Bottle music is a science project for kids on producing sound that explores how volume and liquid affect sound waves. After experimenting with different types of bottles and levels of water, show your friends how this project works and start a bottle music band!
- Eight empty bottles
Step 1: Stand eight empty bottles side by side on a table in front of you. Fill the bottle on the left about 1/4 of the way full with water.
Step 2: Add water to the next bottle so that the water level is a bit higher than in the first bottle. Continue adding water to the bottles so that each one has a little bit more water in it than the bottle to its left.
Step 3: Blow across the bottle on the left, and you'll hear a low note. Blow across the bottle on the right, and you'll hear a high note. By adjusting the amount of water in each bottle, you can produce a whole musical scale.
When you blow across the bottle, you cause the air inside to vibrate, which produces a sound. The amount of air in the bottle affects the sound it makes. The bottles with more air produce low sounds, and the bottles with less air produce high sounds.
Learn how to stop sound in its tracks on the next page.
You don't need to be a super hero to stop sound. This sound barriers science project for kids shows how easy it is to halt sound waves in their tracks.
Step 1: Go into your backyard and stand about as far from your partner as your house is wide. (That should be about 30 feet or so.) Try to talk to one another.
As long as there is nothing between you and your partner, you should be able to hear one another fairly well, though you may have to raise your voice a little.
Step 2: Now stand on one side of a house while your partner stands on the other side. Try to shout something to your partner and see if you can be heard clearly. Have your partner shout something at you.
You may have heard something, but perhaps you could not make out what your partner was saying. Was the sound weak and distorted?
Try the same experiment with a wall between you and your partner. Try it with a fence, a window, a blanket, and other types of barriers. Does the thickness of the barrier matter?
Contributing Writers: Sound Barriers by Maria Birmingham, Karen E. Bledsoe, and Kelly Milner Halls
Please copy/paste the following text to properly cite this HowStuffWorks.com article:
Science Fun

Noisy Paper Sound Science Experiment
In this fun and easy sound science experiment, we’re going to explore and investigate sound by making noisy paper. This is a great sound science activity that easily helps visualize the relationship between mechanical vibrations and the resulting sound. You will easily be able to watch the paper vibrate and hear the sound the noisy paper makes.
- Two pieces of printer paper
Instructions:
- Hold the two pieces of paper up in front of your mouth.
- Pull the bottom piece out about a half an inch.
- Blow strongly toward the middle of the two papers.
- You may have to adjust your distance from the paper, how hard you are blowing, or how far out the bottom sheet of paper is from the top.
- You should hear a loud vibrating noise.
EXPLORE AWESOME SCIENCE EXPERIMENT VIDEOS!
How it Works:
As you blow across the paper, a stream of air works its way between the two sheets of paper. The air cause the paper to start vibrating. The quickly moving paper creates sound waves that travel to your ears as sound. Watch the differences in the speed of the paper movement as you change the force at which you blow air across the noisy paper and observe the differences in the sound.
Make This A Science Project:
Use different types of paper like construction paper or cardstock. Adjust the length of which you pull out the bottom sheet of paper. Try adding additional pieces of paper.
EXPLORE TONS OF FUN AND EASY SCIENCE EXPERIMENTS!
SUBSCRIBE AND NEVER MISS A NEW SCIENCE FUN VIDEO!
previous experiment
Next experiment.

IMAGES
COMMENTS
Aug 26, 2024 · Through the use of sound waves generated by a moving sound source, students can investigate the Doppler effect in this experiment. Students can learn about the Doppler effect and its use in disciplines like astronomy and radar technology through this exercise in an useful and fascinating way. 9. Soundproofing Experiment
Sound Wave Experiments for Kids: Following are five fun sound wave experiments you can make at home with just a few simple supplies. Your kids or students will love them. If you are teaching about the human body and how ears work, or maybe have a lesson on the five senses, I am sure you will find one of these that will work perfectly for you ...
Nov 19, 2018 · Learning about sound is endlessly fascinating, but can be tricky for little learners to grasp. Encourage your child to explore the exciting science of sound using simple and practical hands-on activities. This article shares 7 cool sound science experiments your child will love!
Apr 26, 2021 · Students experiment with a sensor-based phone app to measure and graph sound levels in the classroom and then determine what levels are most conducive for different classroom activities. (Students interested in exploring noise levels further can experiment using the Extreme Sounds: Lessons in a Noisy World project.
Since the sound levels for this part of the experiment should be more constant, you can record for a shorter period of time, like 5 or 10 seconds, and then determine the average value from your data. Move your phone, or the sound meter away from the speaker 1 meter (39.4 inches) and take another three decibel readings.
Jan 31, 2020 · What does sound look like? This fun 5-item science experiment helps kids “see” sound waves and have fun while doing it. In this article, we include a demonstration video, a supplies list, detailed printable instructions, experiment variations, and an easy to understand scientific explanation of how it works. Bonus: Kids love this experiment because not […]
Sound Tubes. We got some of these “Pull and Pop” tubes for the kids to play with. They’re fun on their own, but we discovered a cool sound experiment playing with them. If you expand a tube all the way and swing it around in a circle, it makes a cool sound. The corrugated shape lends itself well to sound.
Sound Wave Model. Find out how sound travels from molecule to molecule. A Simple Telephone. With some string and a couple of plastic containers, discover how sound travels to a telephone. Bottle Music. Learn how the volume of water and air in a bottle produces various sounds. Sound Barriers. Stop sound waves in their tracks with these simple ...
In this fun and easy sound science experiment, we're going to explore and investigate sound by making noisy paper. This is a great sound science activity that easily helps visualize the relationship between mechanical vibrations and the resulting sound. You will easily be able to watch the paper vibrate and hear the sound the noisy paper makes. Materials: Two pieces of printer paper ...
Feb 12, 2024 · The predictable behavior of sound waves allows these animals to use sound instead of sight to learn about the location of objects in their immediate environment! You can do a sound experiment using two paper towel tubes and a pie pan, or for a group of children, assign one the role of bat and the rest, insects.